
The Smart Water Valve Decision: A Homeowner’s Guide to DIY vs. Pro Installation
Congratulations. You’ve decided to install an automatic water shut-off valve in your home. That single decision puts you ahead of 99% of homeowners and is the single most powerful step you can take to prevent catastrophic water damage. You’ve done the “what.” Now it’s time for the “how.”
This brings you to a critical fork in the road: Do you call a licensed plumber, or do you tackle this project yourself? For years, the answer was heavily skewed toward calling a pro. But a new class of smart home technology has emerged, and it’s completely changing the decision-making process. Let’s walk through both paths so you can choose the right one for your home and your comfort level.
Path #1: The Professional Route
Hiring a licensed plumber is the traditional and, for many, the most sensible path. This typically involves them installing an “in-line” valve, which means they will physically cut a section of your main water pipe and solder or fit a new, electronically controlled valve into place.
- The Pros:
- Expertise: A pro knows how to handle unexpected issues, works with different types of pipes (copper, PEX, PVC), and ensures the job is done to code.
- Guarantee: The work is almost always warrantied. If the new valve leaks, it’s their responsibility to fix it.
- Peace of Mind: For many, the value of knowing it was installed by an expert is worth the cost.
-
The Cons:
-
Cost: This is the main drawback. While the valve itself might cost a couple of hundred dollars, you can expect to pay an additional 200 to 500 or more in labor, depending on your location and the complexity of the job.
-
Who It’s For: If you have older or non-standard plumbing, a main valve that is difficult to access, or simply have zero interest in home plumbing projects, this is the clear and wise choice.
Path #2: The DIY Route
For the hands-on homeowner, the DIY path is tempting. But it’s crucial to understand that “DIY” now means two very different things.
The Old DIY (The “Hard” Way):
This meant buying an in-line valve and doing the work of a plumber yourself. It required shutting off the water to the house, draining the pipes, cutting the main line with a pipe cutter, and then soldering or using compression fittings to install the new valve. The risk here is significant. A small mistake can lead to a persistent leak, turning your preventative measure into the source of a problem.
The New DIY (The “Smart” Way):
This is the game-changer. In recent years, a new category of “retrofit” or “no-plumb” actuators has hit the market. These devices don’t require you to touch the plumbing at all.
Think of it this way: instead of replacing your existing valve, you are installing a small, powerful robot that physically turns the handle of your current valve for you.
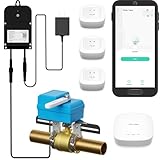
How the New DIY Works: A Quick Case Study
A perfect example of this technology is the YoLink EVO Valve Operator. Here’s how it works:
1. It comes with a mounting bracket that clamps securely onto your existing water pipe.
2. The main motor unit attaches to this bracket, positioning a “gripper” directly over the handle of your existing ball valve.
3. When it receives a signal (from a leak sensor or your app), the motor engages, turning the gripper and closing your valve, just as you would by hand.
The entire installation typically takes 15-30 minutes and requires little more than a screwdriver. There is zero risk of causing a leak because the plumbing itself is never opened.
Your Final Decision Checklist
So, which path is right for you? This isn’t a quiz, but a series of points to consider about your specific situation.
- Assess your main water valve’s type and accessibility. The new DIY devices work best with quarter-turn ball valves (the ones with a single, straight lever handle). If you have an old, multi-turn gate valve (that looks like a hose spigot), a professional replacement is often the better route. Also, ensure you have enough physical space around the pipe to mount the device.
- Evaluate your own comfort level with basic tools. If you’re comfortable assembling furniture or mounting a TV on the wall, you have the skills needed to install a retrofit actuator. No special knowledge is required.
- Determine your budget and timeline. The cost savings of the new DIY method are substantial. If your budget is tight, this makes a high-end safety system far more attainable. Professional installation, while more expensive, can often be done on a specific schedule.
The Most Important Step is the First One
Whether you decide to call a plumber or open the toolbox yourself, remember this: you’ve already made the most important decision. You’ve chosen to be proactive. You’ve chosen to protect your home.
Thanks to modern, user-friendly technology, this critical home upgrade is no longer the exclusive domain of professional plumbers. The path you choose is less important than the destination: a safer, better-protected home and the invaluable peace of mind that comes with it.